Beschreibung
Hey guys,
This has been one of my latest builds I've done, actually this was a guide prepared by Stew while ago.
My very first digital drone using the Walksnail Moonlight kit.
It's been pretty good overall, but I had a bit of a challenge fitting everything in the frame. The capacitor goes all the way to the front, and I'm not a fan of how my battery wires are done, but it works.
Also, my antennas keep sliding out of the TPU mount. it's something I have yet to fix.
But, the frame is durable, and I am having lots of fun with it. Anyone has similar setup?
Komponenten
 FlyFishRC Volador II VX5 O3 5" Freestyle Frame KitRahmenAuf LagerAb $59.99In 5 Shops erhältlich
 EMAX RSIII III 2207 1800KV MotorRahmenAuf LagerAb $19.99In 12 Shops erhältlich
 SpeedyBee BLS 60A 3-6S 4in1 ESC - 30x30mmESCAuf LagerAb $78.89In 1 Shop erhältlich
 SpeedyBee F405 V4 3-6S 30x30 Flight ControllerFlugsteuerungNicht vorrätig
 Walksnail Avatar HD Moonlight Kit 20x20 / 25x25 VTX Kit w/ Micro Moonlight Camera - (Dual Antenna)VideosenderAuf LagerAb $9.99In 16 Shops erhältlich
 RadioMaster RP1 V2 2.4GHz ELRS Nano ReceiverEmpfängerAuf LagerAb $18.22In 25 Shops erhältlich
 Walksnail Avatar HD Goggles XSchutzbrilleAuf LagerAb $25.90In 29 Shops erhältlich
 RadioMaster Pocket Radio ControllerRadioAuf LagerAb $59.99In 30 Shops erhältlich
Verkabelung
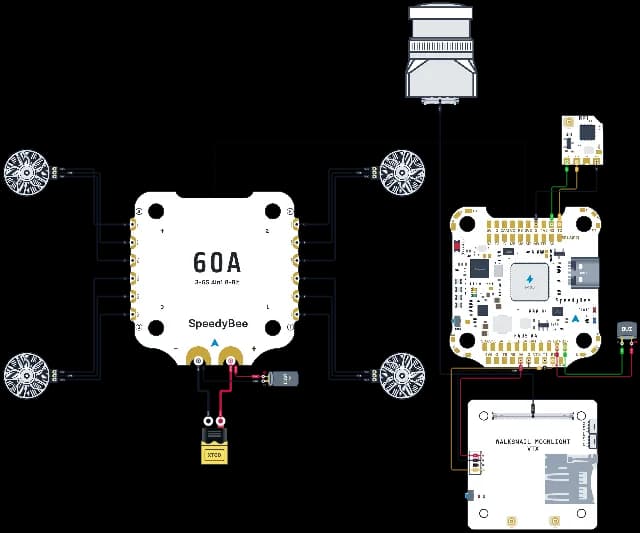
FlyFish Volador II - Speedybee V4 - Walksnail
Vollständigen Schaltplan öffnenÄhnliche Builds


T
24.09.2026
Build-Details
| Kategorie | Freestyle |
|---|---|
| Likes | 11 |
| Aufrufe | 362 |
| Gewicht | 428 g |
| Videosystem | Walksnail |
| Akku | 6S |
| Propeller | 5 in |
| Ungefähre Kosten | €400 |
Entwirf dein eigenes Modell
Lege deine Bauteile im Drone Builder aus und lass den Verdrahtungsassistenten herausfinden, was mit was verbunden wird.
Öffne den Drohnen-Konfigurator
Kommentare (2)
AAurilFPV Very similar to my first 5" build, I just had dji and AE 2306 motors. Love it! Definitely thought it was going to be more beginner friendly as well, turns out the xt60 insert and receiver bay on the bottom were a lot harder to figure out than expected. its very solid, got mine up to 91mph during average flight. found a bando file on thingiverse for it as well if you want some projects for the new printer!
https://www.thingiverse.com/thing:7227614 Ttpetersons AutorOh, thanks! Waiting for some filaments and will have a go. yeah that xt60 was not very easy 🤣
Du musst angemeldet sein, um auf diesen Kommentar zu antworten.